Breads / Kebab

Homemade Pita Pocket

By How To Make A Kebab Editorial Team Updated April 22, 2026

THE PERFECT HOMEMADE PITA A visual guide to mixing, shaping, and achieving the ultimate pocket. This version focuses on the Eastern Mediterranean style, with practical home-cooking guidance for texture, seasoning, and serving. Key ingredients include Bread flour, Warm water, Active dry yeast, supported by the technique notes on the page. The method starts with tHE PERFECT HOMEMADE PITA A visual guide to mixing, shaping, and achieving the ultimate pocket. [A steaming pita bread is split in half on a dark slate surface, revealing a large, hollow internal pocket. Wisps of steam rise from the center.] - Read Time: 3 Mins - Difficulty: Intermediate Origin: Eastern Mediterranean. Find the ingredients, method, and serving notes for a more authentic homemade version.

Prep Time
45m
Difficulty
Medium
Origin
Eastern Mediterranean
Homemade Pita Pocket

THE PERFECT HOMEMADE PITA A visual guide to mixing, shaping, and achieving the ultimate pocket.

THE PERFECT HOMEMADE PITA A visual guide to mixing, shaping, and achieving the ultimate pocket. [A steaming pita bread is split in half on a dark slate surface, revealing a large, hollow internal pocket. Wisps of steam rise from the center.] - Read Time: 3 Mins - Difficulty: Intermediate

Ingredients

  • Bread flour
  • Warm water
  • Active dry yeast
  • Sugar
  • Kosher salt
  • Olive oil
  • Onion
  • Tomatoes

Why This Recipe Works

  • THE KNEAD & TEXTURE CHECK [A pair of hands is shown kneading a smooth ball of dough on a dark countertop.] THE POKE TEST Press firmly. If the dough immediately springs back, the gluten network is fully developed. [A circular inset shows a finger pressing into the dough with arrows indicating the dough pushing back out.] Knead vigorously for 8-10 minutes. Watch the transition: it will go from rough and sticky to smooth, highly elastic, and slightly tacky.
  • THE SECOND REST (THE SECRET STEP) [Four dough discs sit on a dark surface, partially covered by a linen cloth. A central graphic features an hourglass icon and the text "15 MINUTE TIMER".] Do not bake immediately! Let the rolled discs rest undisturbed for 15 minutes. This crucial pause relaxes the tight gluten, ensuring the bread puffs outward in the oven rather than snapping back.
  • QUICK-REFERENCE RECIPE CARD THE MIX - 3 Cups Flour - 1 Cup Warm Water - 2 Tsp Yeast - 1 Tsp Salt - 1 Tbsp Oil THE TIMELINE - Knead: 10 Min - First Rest: 1 Hr - Second Rest: 15 Min THE SPECS - Roll: 1/4 Inch Thick - Bake: 500°F (260°C) - Flip: At 2 Minutes Save this guide for your next bake.

Chef Tip

THE SECOND REST (THE SECRET STEP) [Four dough discs sit on a dark surface, partially covered by a linen cloth. A central graphic features an hourglass icon and the text "15 MINUTE TIMER".] Do not bake immediately! Let the rolled discs rest undisturbed for 15 minutes. This crucial pause relaxes the tight gluten, ensuring the bread puffs outward in the oven rather than snapping back.

Also Known As

The Perfect Pita PocketNotebookLM ee241813-516d-45ac-ab58-d82673786615

Step-by-Step Method

  1. 1

    THE PERFECT HOMEMADE PITA A visual guide to mixing, shaping, and achieving the ultimate pocket. [A steaming pita bread is split in half on a dark slate surface, revealing a large, hollow internal pocket. Wisps of steam rise from the center.] - Read Time: 3 Mins - Difficulty: Intermediate

  2. 2

    CORE COMPONENTS Great bread requires precision. Gather and portion your elements before your hands get messy. - Bread Flour: Builds strong gluten structure. [Bowl of white flour] - Warm Water: 105°F (40°C) to wake the yeast. [Bowl of steaming water] - Active Dry Yeast: The lifting agent. [Bowl of yeast granules] - Sugar: A pinch to feed the yeast. [Small bowl of white sugar] - Kosher Salt: For flavor and dough control. [Small bowl of coarse salt] - Olive Oil: For tenderness and richness. [Small bowl of olive oil]

  3. 3

    ACTIVATING THE YEAST [Two small glass bowls are shown: one with dry granules labeled "Dormant", and one with a bubbly, frothy mixture labeled "Activated (Foaming)". An arrow labeled "Wait 5-10 Mins" connects them.] [A golden arrow points from the activated yeast bowl into a large ceramic bowl containing flour with a well pressed into the center.] Whisk yeast, sugar, and warm water. When it foams vigorously, your yeast is alive. Pour the mixture into a flour well and mix until a shaggy dough forms.

  4. 4

    THE KNEAD & TEXTURE CHECK [A pair of hands is shown kneading a smooth ball of dough on a dark countertop.] THE POKE TEST Press firmly. If the dough immediately springs back, the gluten network is fully developed. [A circular inset shows a finger pressing into the dough with arrows indicating the dough pushing back out.] Knead vigorously for 8-10 minutes. Watch the transition: it will go from rough and sticky to smooth, highly elastic, and slightly tacky.

  5. 5

    THE FIRST PROOF Coat the dough lightly in oil to prevent crusting. Cover with a damp towel and leave in a warm spot. Patience here develops complex flavor and an airy crumb. [A glass bowl containing dough is covered by a textured linen towel. Faint steam surrounds the bowl.] [A timeline graphic at the bottom starts at "Start" and moves right to a point labeled "1 to 2 Hours." It ends at a bell-curve icon labeled "Exact Double Volume".]

  6. 6

    DIVIDING & SHAPING Step 1: Punch down and divide into 8 equal pieces. [A round dough disk is divided into eight triangular wedges by a metal bench scraper.] Step 2: Fold the rough edges inward. [Hands are shown folding the edges of a dough wedge toward its center.] Step 3: Cup your hand and roll rapidly against the un-floured counter to build surface tension. A seamless ball traps the air. [A hand cups a smooth dough ball; circular arrows indicate a rapid rolling motion.]

  7. 7

    ROLLING THE DISCS [A wooden rolling pin rests on a flattened, circular dough disc.] 1/4 Inch (6mm) | 6-Inch Diameter. [A side-view cross-section of the dough disc shows its height and internal porous structure against a ruler graphic.] Roll each ball into an even circle. Precision is vital: too thin, and the walls won't separate to puff; too thick, and the bread remains dense and doughy inside.

  8. 8

    THE SECOND REST (THE SECRET STEP) [Four dough discs sit on a dark surface, partially covered by a linen cloth. A central graphic features an hourglass icon and the text "15 MINUTE TIMER".] Do not bake immediately! Let the rolled discs rest undisturbed for 15 minutes. This crucial pause relaxes the tight gluten, ensuring the bread puffs outward in the oven rather than snapping back.

  9. 9

    THE SCIENCE OF THE PUFF [A cross-section diagram of a pita bread ballooning upward during cooking.] - Top: Stretchy Gluten Canopy. [Arrow points to the curved upper layer of the dough.] - Center: Rapid Steam Expansion. [Blue arrows radiate outward from the center of the internal air pocket.] - Bottom: 500°F Contact Heat. [Red arrows point upward from an orange glowing line representing the hot cooking surface.] The magic of the pocket: Intense heat flash-boils the moisture trapped inside the dough. The rapid steam expands instantly, forcing the top and bottom dough layers apart.

  10. 10

    THE BAKE: SKILLET OR OVEN SKILLET METHOD Smoking-hot cast-iron pan on high heat. [A pita bread has ballooned into a ball inside a steaming cast-iron skillet.] OVEN METHOD Preheated pizza stone at 500°F (260°C). [A pita bread is fully puffed on a pizza stone inside a dark oven.] Whichever heat source you choose, flip the bread after 2 minutes the moment small bubbles form on the surface. Then, watch it balloon.

  11. 11

    THE STEAM TRAP As soon as they come off the heat, wrap the blazing hot pitas tightly in a clean kitchen towel. This traps residual steam, conditioning the crust and keeping the bread incredibly soft and pliable. [Hands wrap a stack of three charred pita breads in a white linen cloth. Steam rises in decorative swirls from the stack.]

  12. 12

    TROUBLESHOOTING MATRIX - Perfect: High heat, right thickness. [A perfectly puffed, golden-brown pita bread.] - Didn't Puff?: Oven/skillet was not hot enough. [A flat, pale dough disc with no air pocket.] - Too Dense?: Dough was rolled too thick. [A cross-section of a thick pita with very little internal air space.] - Cracked Surface?: Dough dried out during the rests. [The top of a pita bread with dry, flaky cracks across the surface.]

  13. 13

    OPENING THE POCKET Let the bread cool just enough to handle safely. Slice off the top edge or cut straight through the middle to reveal the structural reward of your precision: a perfect, durable pocket ready to be stuffed. [A serrated knife slices into the top curve of a puffed pita bread resting on a wooden cutting board.]

  14. 14

    THE PERFECT PAIRING The ultimate vessel. Load your fresh, pliant pita with warm gyro meat or charred kebabs, crisp vegetables, and cool tzatziki for a world-class homemade street-food experience. [A pita bread stands upright, filled to the brim with shaved gyro meat, red onion slices, and tomatoes. Creamy tzatziki sauce drips down the front.]

  15. 15

    QUICK-REFERENCE RECIPE CARD THE MIX - 3 Cups Flour - 1 Cup Warm Water - 2 Tsp Yeast - 1 Tsp Salt - 1 Tbsp Oil THE TIMELINE - Knead: 10 Min - First Rest: 1 Hr - Second Rest: 15 Min THE SPECS - Roll: 1/4 Inch Thick - Bake: 500°F (260°C) - Flip: At 2 Minutes Save this guide for your next bake.

Visual Preparation Notes

Homemade Pita Pocket visual note 1
Dia 1

The Perfect Homemade Pita deck introduces a visual method for mixing, shaping, and baking pita that opens into a reliable pocket.

Homemade Pita Pocket visual note 2
Dia 2

The core ingredients are bread flour, warm water, active dry yeast, sugar, kosher salt, and olive oil, measured before mixing for better control.

Homemade Pita Pocket visual note 3
Dia 3

Yeast is bloomed with warm water and sugar until foamy, then poured into a flour well and mixed into a shaggy dough.

Homemade Pita Pocket visual note 4
Dia 4

The dough is kneaded for 8 to 10 minutes until smooth, elastic, and slightly tacky, then checked with the poke test.

Homemade Pita Pocket visual note 5
Dia 5

The first proof happens under a damp towel in a warm spot until the dough roughly doubles, building flavor and a lighter crumb.

Homemade Pita Pocket visual note 6
Dia 6

After proofing, the dough is divided into eight equal pieces and shaped into tight balls with surface tension.

Homemade Pita Pocket visual note 7
Dia 7

Each ball is rolled into an even disc about 1/4 inch thick and 6 inches wide so the pocket can form without becoming dense.

Homemade Pita Pocket visual note 8
Dia 8

A second 15-minute rest lets the rolled discs relax, which helps them puff instead of snapping back in the oven or skillet.

Homemade Pita Pocket visual note 9
Dia 9

The pocket forms when intense heat turns internal moisture into steam and forces the top and bottom dough layers apart.

Homemade Pita Pocket visual note 10
Dia 10

The pita can be baked on a very hot skillet or pizza stone; flip after roughly two minutes when small bubbles appear, then watch for the ballooning puff.

Homemade Pita Pocket visual note 11
Dia 11

Freshly cooked pitas are wrapped in a towel immediately so trapped steam keeps the bread soft and flexible.

Homemade Pita Pocket visual note 12
Dia 12

Troubleshooting centers on heat, thickness, and moisture: low heat prevents puffing, thick dough stays dense, and dried dough cracks.

Homemade Pita Pocket visual note 13
Dia 13

Once cool enough to handle, the pita is sliced open to reveal a durable pocket ready for filling.

Homemade Pita Pocket visual note 14
Dia 14

Fresh pita pockets pair naturally with gyro meat, kebabs, vegetables, and cool tzatziki for homemade street-food style wraps.

Homemade Pita Pocket visual note 15
Dia 15

The quick reference uses 3 cups flour, 1 cup warm water, 2 teaspoons yeast, 1 teaspoon salt, 1 tablespoon oil, a 10-minute knead, 1-hour first rest, 15-minute second rest, and very high heat.

Serving Notes

THE PERFECT HOMEMADE PITA A visual guide to mixing, shaping, and achieving the ultimate pocket. [A steaming pita bread is split in half on a dark slate surface, revealing a large, hollow internal pocket. Wisps of steam rise from the center.] - Read Time: 3 Mins - Difficulty: Intermediate

CORE COMPONENTS Great bread requires precision. Gather and portion your elements before your hands get messy. - Bread Flour: Builds strong gluten structure. [Bowl of white flour] - Warm Water: 105°F (40°C) to wake the yeast. [Bowl of steaming water] - Active Dry Yeast: The lifting agent. [Bowl of yeast granules] - Sugar: A pinch to feed the yeast. [Small bowl of white sugar] - Kosher Salt: For flavor and dough control. [Small bowl of coarse salt] - Olive Oil: For tenderness and richness. [Small bowl of olive oil]

ROLLING THE DISCS [A wooden rolling pin rests on a flattened, circular dough disc.] 1/4 Inch (6mm) | 6-Inch Diameter. [A side-view cross-section of the dough disc shows its height and internal porous structure against a ruler graphic.] Roll each ball into an even circle. Precision is vital: too thin, and the walls won't separate to puff; too thick, and the bread remains dense and doughy inside.

Common Mistakes

  • THE FIRST PROOF Coat the dough lightly in oil to prevent crusting. Cover with a damp towel and leave in a warm spot. Patience here develops complex flavor and an airy crumb. [A glass bowl containing dough is covered by a textured linen towel. Faint steam surrounds the bowl.] [A timeline graphic at the bottom starts at "Start" and moves right to a point labeled "1 to 2 Hours." It ends at a bell-curve icon labeled "Exact Double Volume".]
  • ROLLING THE DISCS [A wooden rolling pin rests on a flattened, circular dough disc.] 1/4 Inch (6mm) | 6-Inch Diameter. [A side-view cross-section of the dough disc shows its height and internal porous structure against a ruler graphic.] Roll each ball into an even circle. Precision is vital: too thin, and the walls won't separate to puff; too thick, and the bread remains dense and doughy inside.
  • TROUBLESHOOTING MATRIX - Perfect: High heat, right thickness. [A perfectly puffed, golden-brown pita bread.] - Didn't Puff?: Oven/skillet was not hot enough. [A flat, pale dough disc with no air pocket.] - Too Dense?: Dough was rolled too thick. [A cross-section of a thick pita with very little internal air space.] - Cracked Surface?: Dough dried out during the rests. [The top of a pita bread with dry, flaky cracks across the surface.]

Recipe Notes

History and Origins of Homemade Pita Pocket

Homemade Pita Pocket belongs to the practical bread culture of Eastern Mediterranean, where bread is not a side note but part of the meal structure. In kebab cooking, the bread decides whether the dish becomes a wrap, a sandwich, a tear-and-share table plate, or a base that catches meat juices. That is why a bread recipe deserves the same respect as the skewer that sits beside it.

Historically, breads like this were shaped around heat: hot stones, domed griddles, clay ovens, tandoors, saj plates, or fierce deck ovens. The exact tool changes from region to region, but the goal stays familiar: a bread that cooks fast, stays flexible, and carries grilled meat, sauces, onions, herbs, or roasted vegetables without falling apart.

A strong home version of Homemade Pita Pocket should taste like it belongs at the kebab table. It needs enough structure to hold fillings, enough tenderness to fold or tear, and enough surface character to absorb fat, yogurt, tahini, tomato sauce, or garlic sauce. When the bread is right, the whole plate feels intentional instead of assembled from separate parts.

The Why Behind the Ingredients

The ingredient list for Homemade Pita Pocket looks humble, but bread is always about ratios. Flour gives structure, water controls softness and extensibility, salt tightens flavor, and yeast or starter decides how much aroma and lift the finished bread carries. Small changes in hydration can turn the same dough from foldable to brittle.

Fat, yogurt, milk, sugar, seeds, or glaze are not random extras when they appear in this recipe. They change browning, tenderness, surface shine, and how the bread behaves around hot fillings. A kebab bread must be flexible while warm and still pleasant after it cools slightly, because real service rarely happens in a perfect thirty-second window.

The key ingredients here are Bread flour, Warm water, Active dry yeast, Sugar, and Kosher salt. Treat them as a system. If the dough is too dry, the bread cracks; if it is too wet, it becomes hard to shape; if it is under-salted, it tastes like plain flour beside a strongly seasoned kebab. Balance matters more than adding more ingredients.

Mastering the Technique

For Homemade Pita Pocket, dough feel matters more than the clock. Knead until the surface becomes smoother and elastic, then rest long enough for the dough to relax. A tense dough fights the rolling pin and shrinks back; a relaxed dough opens easily and bakes more evenly.

Shape with a light hand. Heavy pressing knocks out useful gas and can make the finished bread dense. Dust only as much flour as you need, because excess flour burns on the cooking surface and leaves a dry taste. The best kebab breads are handled confidently but not punished.

Heat must be ready before the bread touches it. Whether you use a skillet, stone, oven, saj, or steel, the surface should be hot enough to set the bread quickly. Low heat dries bread out slowly; strong heat creates puff, color, and flexibility. Stack finished breads under a towel so steam keeps them soft.

How to Serve It Like a Kebab Shop

Homemade Pita Pocket should reach the table warm, flexible, and ready to work. If it is used for wraps, warm it just before filling so it bends without cracking. If it is used under grilled meat, let it catch a little fat or sauce so the bread becomes part of the flavor instead of sitting dry on the plate.

For a kebab-shop style meal, match the bread to the filling. Juicy minced skewers need bread that can absorb fat; sliced doner or gyros needs bread that can fold tightly; slow-cooked meat needs bread strong enough to carry sauce. Homemade Pita Pocket should be chosen because it solves that serving problem.

Do not serve this bread cold from the counter if the rest of the plate is hot. Even a well-made bread feels tired when it is cold. Wrap finished pieces in a towel, reheat gently, and keep them covered until the meat, vegetables, or sauce are ready.

Regional Context and What Makes It Different

Homemade Pita Pocket should be understood through the food habits of Eastern Mediterranean. The local bread, preferred fat, fuel, spices, serving temperature, and garnish all shape the dish. When a recipe is copied without that context, it usually becomes a plain version of itself: edible, but no longer specific.

This is why the details matter. A Turkish minced skewer, a Balkan cevap, a Persian kabab, a Greek wrap, a Levantine shawarma, an Indian tandoor kebab, or a kebab bread may all share fire and bread, but they do not share the same goal. Each one asks for a different texture, different restraint with spices, and a different finish at the table.

For Homemade Pita Pocket, the strongest home version keeps the origin in mind without pretending that a home kitchen is a restaurant pit. Use the tools you have, but keep the priorities intact: the correct texture, the correct heat, and a serving style that makes sense for the dish.

That approach is also what separates useful recipe writing from a thin ingredient list. The recipe is not only what goes into the bowl. It is the reason those ingredients are there, the way the cook judges doneness, and the way the finished food is eaten while still hot.

Step by Step Cooking Logic

The first step is preparation, not cooking. For this recipe, the opening move is: THE PERFECT HOMEMADE PITA A visual guide to mixing, shaping, and achieving the ultimate pocket. [A steaming pita bread is split in half on a dark slate surface, revealing a large, hollow internal pocket. Wisps of steam rise from the center.] - Read Time: 3 Mins - Difficulty: Intermediate Read that as a texture instruction as much as a task. A kebab, bread, sauce, or wrap can fail before heat appears if the pieces are cut poorly, the dough is too tight, the mixture is too wet, or the marinade is unbalanced.

The middle stage is where patience matters. Give the mixture, dough, meat, sauce, or filling enough time to become coherent. Resting is not empty waiting; it lets flour hydrate, salt season, fat firm up, acid mellow, spices bloom, or proteins bind. Skipping that stage is one of the fastest ways to make food that looks right but tastes shallow.

Heat should be chosen for the result you want. Homemade Pita Pocket works best when a hot stone, skillet, saj, tandoor, steel, or oven surface is used with control. Low heat is rarely the friend of kebab-style food unless the recipe is intentionally slow-cooked. Most of these dishes need decisive heat at the right moment so the outside sets before the inside dries out.

The final step is service: QUICK-REFERENCE RECIPE CARD THE MIX - 3 Cups Flour - 1 Cup Warm Water - 2 Tsp Yeast - 1 Tsp Salt - 1 Tbsp Oil THE TIMELINE - Knead: 10 Min - First Rest: 1 Hr - Second Rest: 15 Min THE SPECS - Roll: 1/4 Inch Thick - Bake: 500°F (260°C) - Flip: At 2 Minutes Save this guide for your next bake. A kebab recipe is incomplete if it stops at cooked meat or baked bread. The last minute with bread, onions, herbs, yogurt, tahini, tomato, pickles, rice, butter, or sauce often decides whether the dish feels authentic or unfinished.

Texture and Doneness Cues

The finished texture for Homemade Pita Pocket should be flexible, warm, and strong enough to hold fillings without cracking. Do not judge only by time, because thickness, heat strength, pan material, dough hydration, meat cut, and room temperature can all change the clock. Learn the visual and tactile cues instead.

Browning should look appetizing, not accidental. Golden bread, charred pepper edges, browned meat ridges, blistered paneer, crisp falafel crust, or lightly caramelized sauce-covered pieces are all good signs when they match the recipe. Flat gray meat or pale bread usually means too much moisture or not enough heat.

Juiciness has to be protected. Meat recipes need enough fat, correct resting, and the discipline to stop cooking before the center tightens. Bread recipes need steam and coverage after cooking. Sauces need enough body to cling. Vegetarian recipes need contrast so the inside does not feel pasty.

If you are unsure, test a small portion before committing the whole batch. A tiny pan test can reveal salt level, binding, wetness, heat response, and texture problems. Pitmasters and bakers do this instinctively; home cooks should use the same habit.

Flavor Balance and Seasoning Adjustments

The main flavor structure of Homemade Pita Pocket comes from Bread flour, Warm water, Active dry yeast, Sugar, and Kosher salt. Those ingredients should be easy to taste in the final dish. If the seasoning hides the main ingredient completely, the recipe has lost its center. If the main ingredient tastes plain, the seasoning has not done enough work.

Salt is the quiet foundation. It controls flavor, but it also affects texture in meats, doughs, and some vegetable mixtures. Add it with intention and taste when possible. Under-salted kebab food tastes dull even when the grill marks look perfect; over-salted food makes every garnish feel desperate.

Acid, heat, sweetness, herbs, smoke, and fat should pull against each other. Lemon, vinegar, yogurt, tomato paste, pomegranate molasses, onion, garlic, pepper, mint, parsley, sumac, saffron, butter, olive oil, or tail fat each changes the balance. Do not add more of everything. Adjust the element that is missing.

At serving time, use garnishes as seasoning tools. Raw onion sharpens richness, herbs lift fat, yogurt cools spice, pickles cut heaviness, warm bread absorbs juices, and grilled vegetables add sweetness. The garnish is not decoration; it is the final seasoning layer.

Make Ahead, Storage, and Reheating Strategy

Homemade Pita Pocket can usually be prepared in stages, but the best stage to pause depends on the style. Dough can often rest cold, meat mixtures can be chilled before shaping, marinades can work ahead of time, and sauces often improve after resting. Finished kebabs, however, are almost always best right after cooking.

Store components separately when possible. Keep bread wrapped, sauce covered, raw mixtures chilled, and cooked meat away from watery garnishes. If everything is packed together too early, bread gets soggy, herbs wilt, browned edges soften, and the careful texture you built disappears.

Reheating should be gentle but purposeful. Bread needs steam or a covered pan, meat needs moderate heat so fat softens without drying, sauces need stirring, and fried or roasted vegetarian pieces may need a hot pan or oven to bring back the edge. Microwaving everything together is the fastest way to lose contrast.

For food safety, keep raw meat, raw poultry, dairy sauces, and cooked food in separate containers and chill them promptly. Recipe tradition is important, but it never replaces clean handling, safe storage, and proper reheating in a home kitchen.

Common Mistakes and How to Fix Them

The first mistake is treating Homemade Pita Pocket like a generic template. If you ignore the origin, bread, garnish, fat level, or heat style, the dish may still be edible, but it will not feel like itself. The fix is to choose one clear regional direction and support it all the way through the plate.

The second mistake is confusing more ingredients with more authority. Many classic kebab dishes are powerful because they are focused. Additions should solve a problem: tenderness, moisture, acidity, aroma, color, or structure. If an ingredient does not have a job, leave it out.

The third mistake is weak heat management. Most kebab food needs decisive heat at some stage, even if part of the recipe is slow or gentle. Without browning, blistering, roasting, puffing, or charring, the final flavor stays flat. Control heat instead of fearing it.

The fourth mistake is serving too late. Bread cools, fat tightens, sauce thickens, herbs wilt, and grilled edges soften. Set the table before the final cooking stage so Homemade Pita Pocket can be eaten when it has the most aroma, texture, and confidence.

Home Kitchen Testing Notes

A serious home recipe should be repeatable, not lucky. The first time you cook Homemade Pita Pocket, write down the thickness, resting time, heat source, cooking time, and any changes you made to the ingredients. Those details help you understand the recipe as a method instead of treating it like a fixed list that either works or fails.

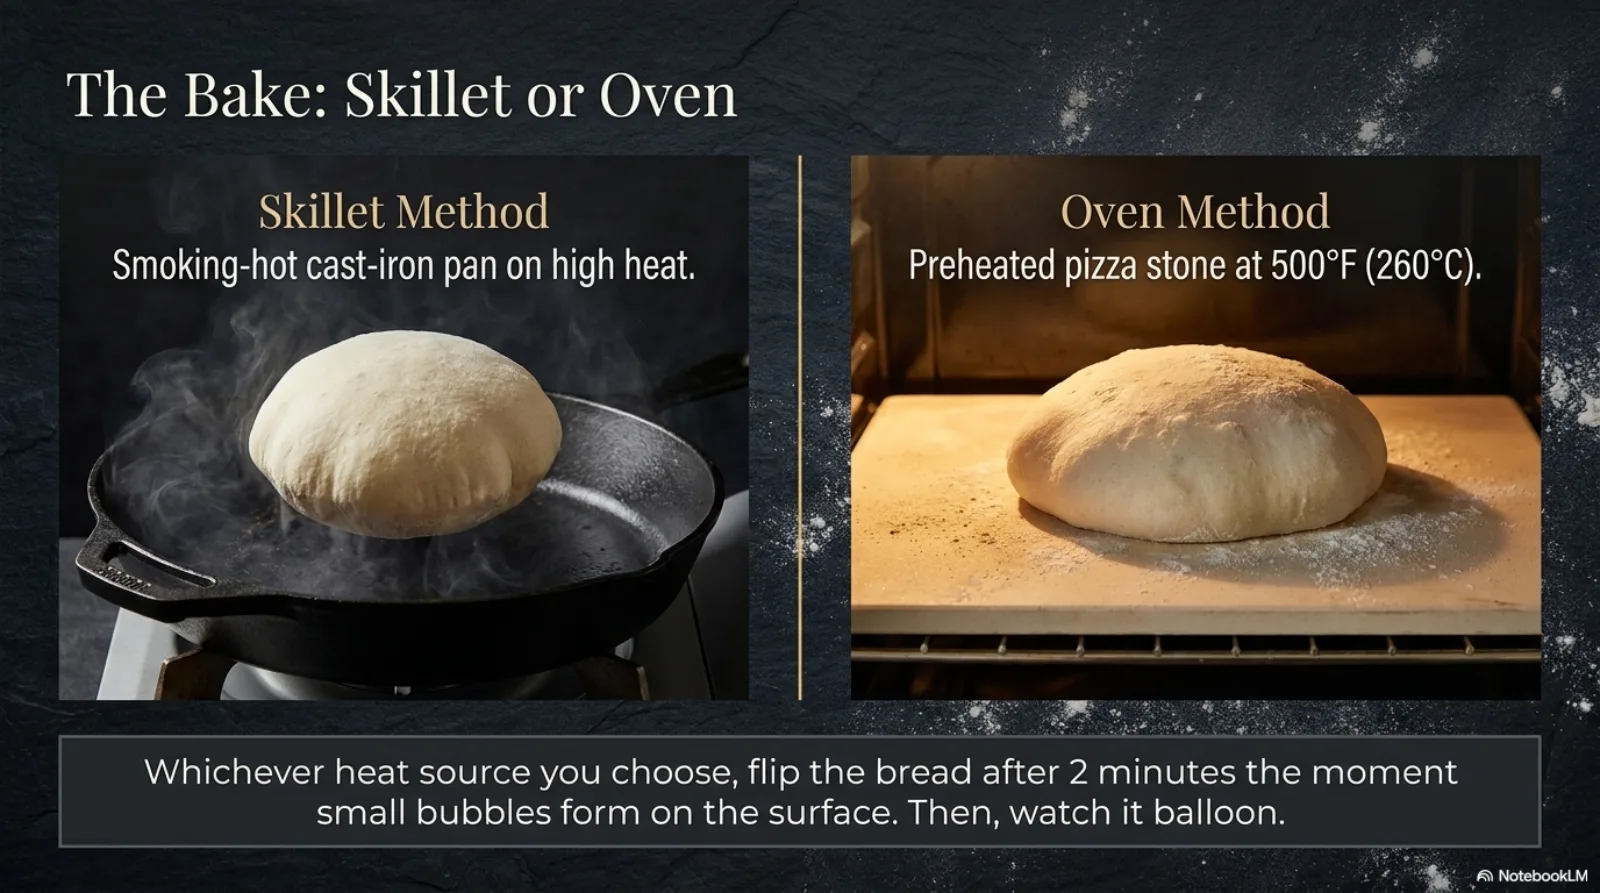
If your kitchen does not have the exact traditional tool, replace the function of the tool rather than only its shape. A charcoal mangal gives dry, direct heat and smoke; a broiler gives top heat; cast iron gives contact browning; a baking steel or stone gives bottom heat for bread. Choose the substitute that recreates the job the original tool was doing.

Batch size also changes results. A small batch of Homemade Pita Pocket warms quickly, loses moisture quickly, and is easier to season evenly. A large batch needs colder handling, more space, and more disciplined timing. When scaling up, mix and cook in portions so the food keeps the same texture from the first piece to the last.

Use smell as a real cooking signal. Raw onion, garlic, flour, yogurt, spices, lamb fat, chickpeas, herbs, and pepper all smell different when they are raw, cooked, toasted, or burned. When the aroma turns sweet, nutty, grilled, or pleasantly sharp, you are usually close. When it turns bitter or dusty, the heat or timing needs correction.

The best test is the first bite without too many extras. Taste Homemade Pita Pocket plain before adding a full plate of bread, salad, pickles, yogurt, hot sauce, or rice. If it tastes balanced on its own, the accompaniments will make it better. If it needs the garnish to hide dryness, blandness, bitterness, or poor texture, fix the base recipe before the next batch.

One useful habit is to separate the first serving from the main batch. Cook one small test piece, taste it, and decide whether the mixture needs more salt, more rest, more acid, more heat, or a colder handling stage. This small test protects the whole recipe and makes the final serving calmer.

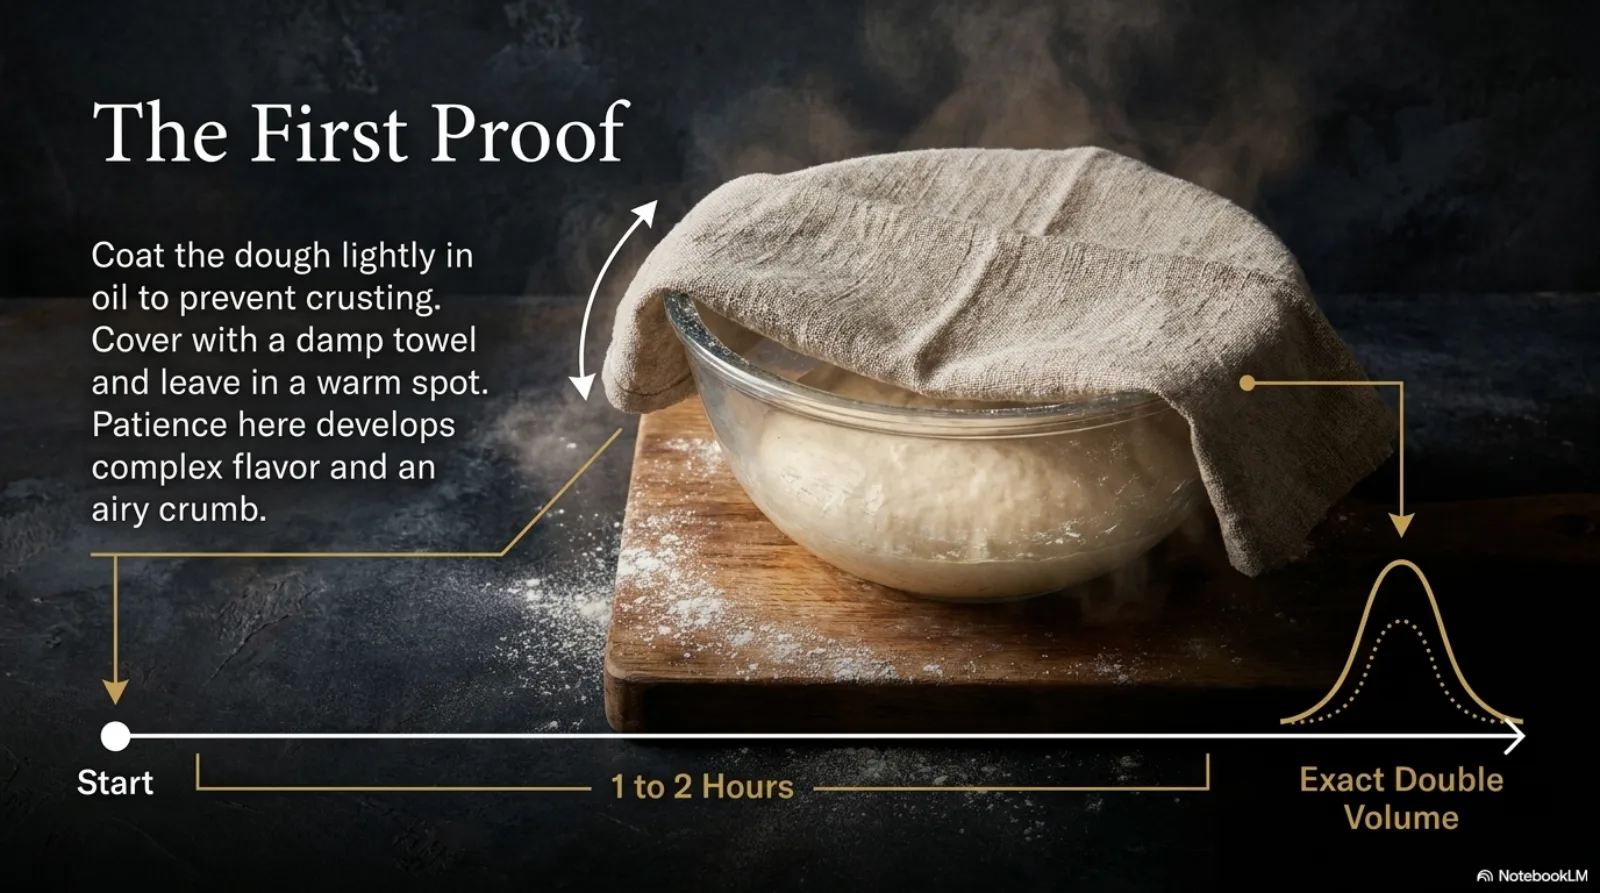
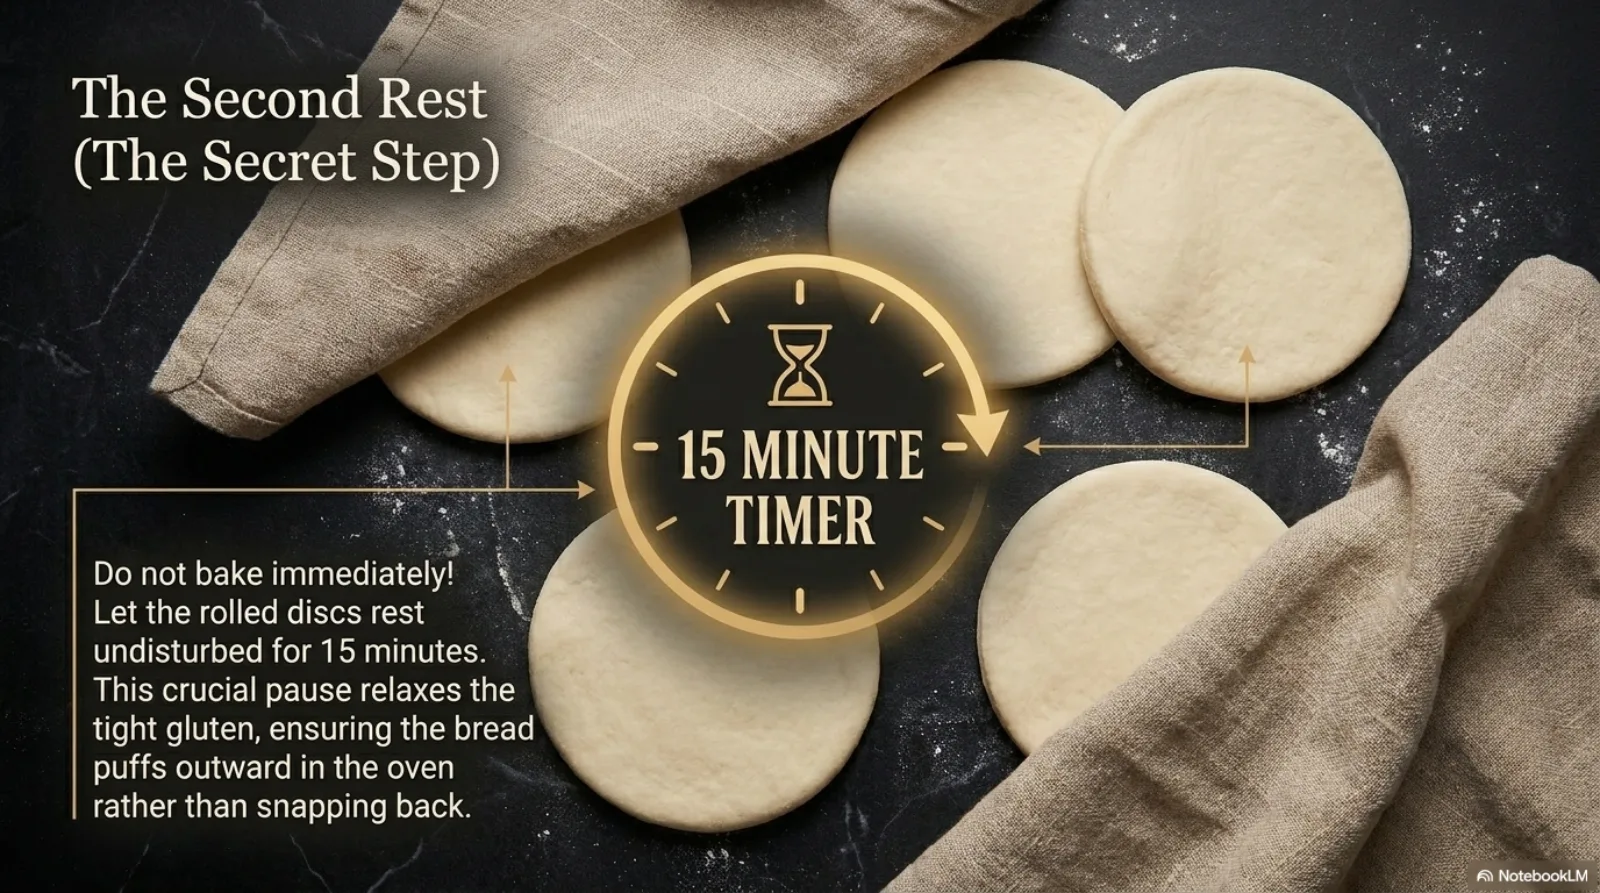
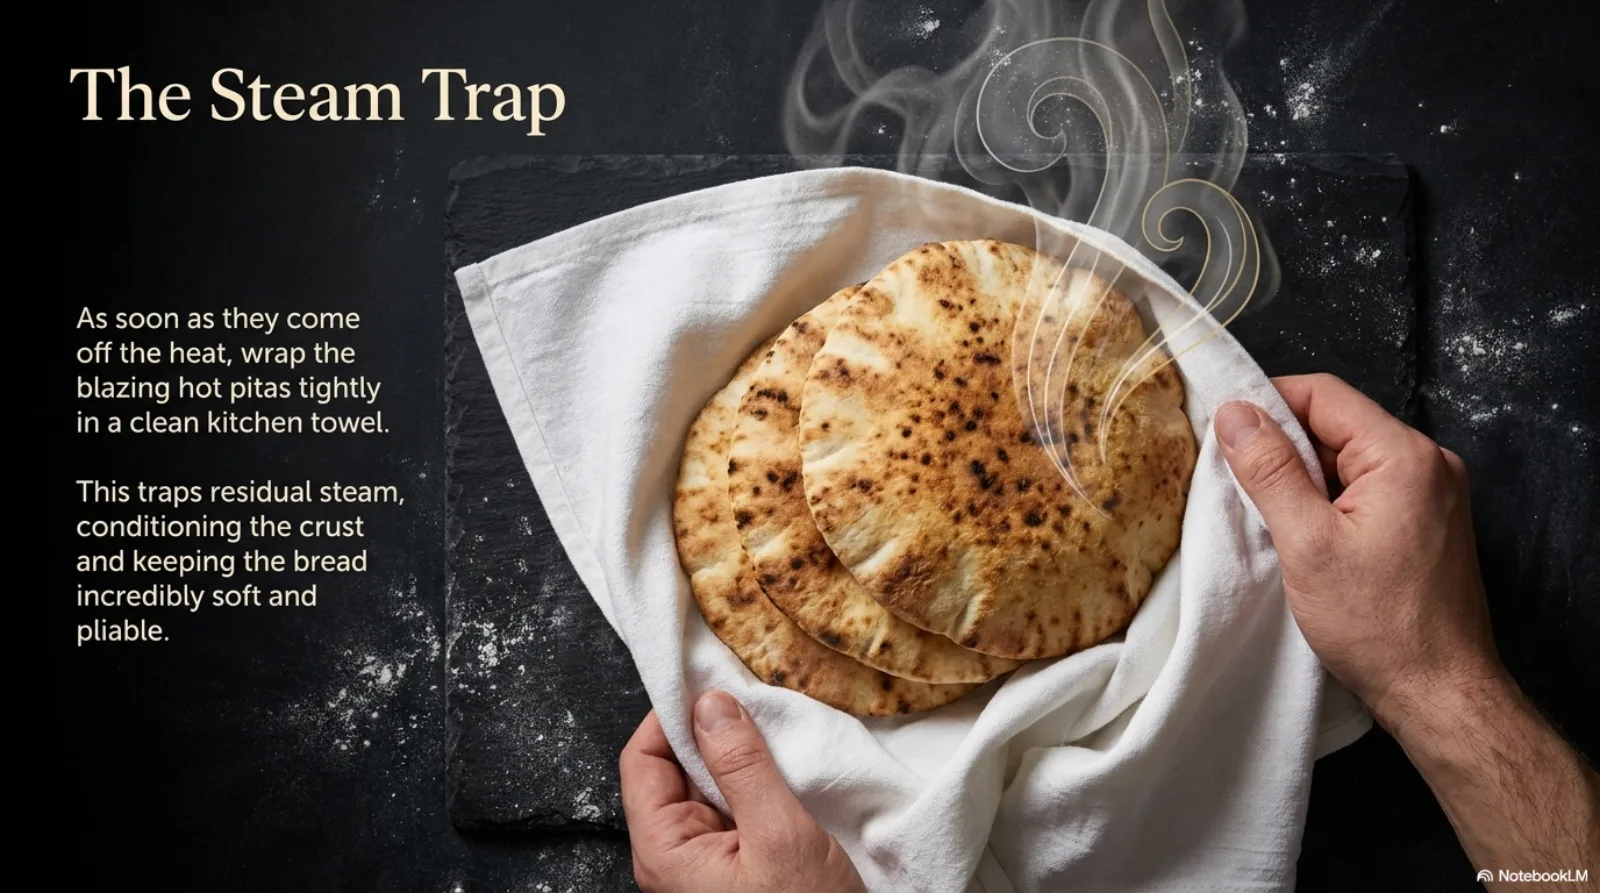
Think about moisture at every stage. Raw mixtures can look correct but still release liquid after resting; breads can dry while waiting to cook; sauces can thicken after chilling; grilled pieces can lose juice if sliced or served too late. Managing moisture is often the difference between a recipe that tastes homemade and one that tastes carefully prepared.

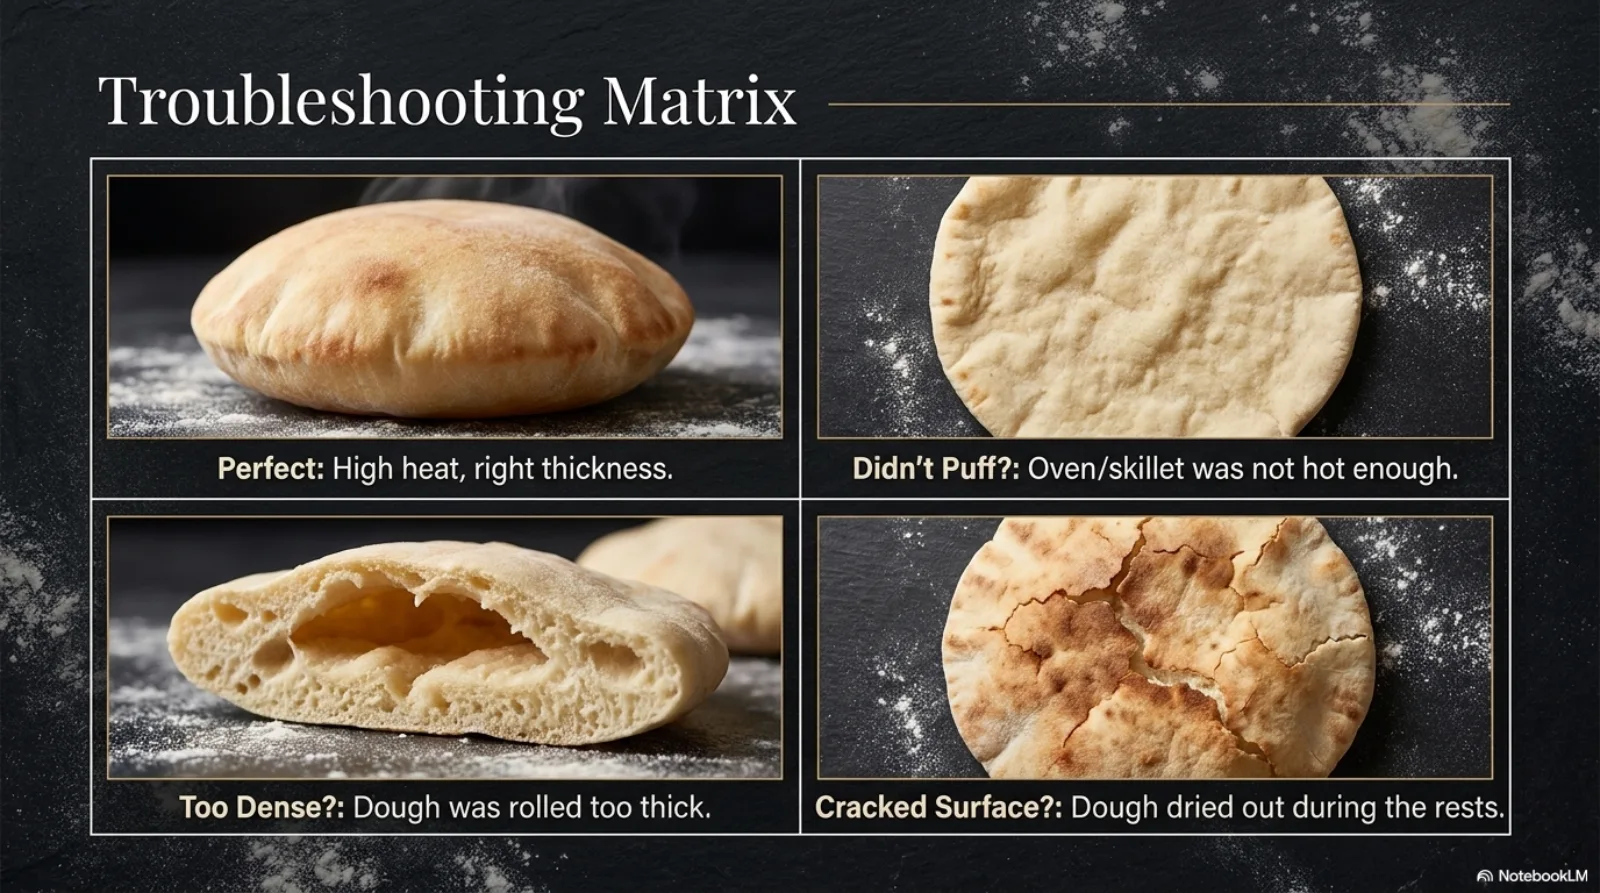
These notes matter because they turn Homemade Pita Pocket into practical culinary guidance instead of a bare list. A reader should leave knowing not only the ingredient list, but why the dish behaves the way it does, how to diagnose problems, and how to make a more confident second attempt in a normal home kitchen.

Frequently Asked Questions

What should I focus on first when making Homemade Pita Pocket?

THE KNEAD & TEXTURE CHECK [A pair of hands is shown kneading a smooth ball of dough on a dark countertop.] THE POKE TEST Press firmly. If the dough immediately springs back, the gluten network is fully developed. [A circular inset shows a finger pressing into the dough with arrows indicating the dough pushing back out.] Knead vigorously for 8-10 minutes. Watch the transition: it will go from rough and sticky to smooth, highly elastic, and slightly tacky.

Can I prepare Homemade Pita Pocket ahead of time?

THE SECOND REST (THE SECRET STEP) [Four dough discs sit on a dark surface, partially covered by a linen cloth. A central graphic features an hourglass icon and the text "15 MINUTE TIMER".] Do not bake immediately! Let the rolled discs rest undisturbed for 15 minutes. This crucial pause relaxes the tight gluten, ensuring the bread puffs outward in the oven rather than snapping back.

What should I serve with Homemade Pita Pocket?

THE PERFECT HOMEMADE PITA A visual guide to mixing, shaping, and achieving the ultimate pocket. [A steaming pita bread is split in half on a dark slate surface, revealing a large, hollow internal pocket. Wisps of steam rise from the center.] - Read Time: 3 Mins - Difficulty: Intermediate

Why is my Homemade Pita Pocket tough instead of soft?

The usual causes are too little water, too much bench flour, under-rested dough, or low cooking heat. Homemade Pita Pocket needs enough hydration and enough rest for the dough to relax, then a hot surface so it cooks quickly without drying out.

Can I make Homemade Pita Pocket ahead of time?

Yes. Cook it, wrap it in a clean towel while warm, then store it airtight. Reheat gently in a covered pan or wrapped in foil so steam brings back flexibility instead of making the bread brittle.

Why did my Homemade Pita Pocket not puff or blister?

The heat was probably too low, the dough was rolled unevenly, or the dough dried out before cooking. Keep the surface hot, roll evenly, and cover the shaped dough while waiting so the outside stays supple.

Related Recipes

NYC Halal White Sauce

The secret sauce of NYC street carts. This version focuses on the New York City, USA style, with practical home-cooking guidance for texture, seasoning, and serving. Key ingredients include 1/2 cup Mayonnaise (Heavy duty), 1/2 cup Greek Yogurt, 1 tbsp Sugar, supported by the technique notes on the page. The method starts with wHISK: Combine mayonnaise, Greek yogurt, sugar, vinegar, black pepper, and dill until the sauce looks smooth.

Tirnakli Pide

Turkish "Fingernail" Bread. Chewy, dimpled flatbread essential for Adana Kebab. This version focuses on the Turkey style, with practical home-cooking guidance for texture, seasoning, and serving. Key ingredients include 1kg Bread Flour, 750ml Warm Water (High Hydration), 10g Instant Yeast, supported by the technique notes on the page. The method starts with dOUGH: Mix flour, water, yeast, and salt. It will be very sticky. Glue-like consistency is correct.

Balloon Lavas

Thin, hollow flatbread that puffs up like a balloon in the oven. Spectacular presentation. This version focuses on the Turkey style, with practical home-cooking guidance for texture, seasoning, and serving. Key ingredients include 500g All-Purpose Flour, 300ml Warm Water, 1 tsp Salt, supported by the technique notes on the page. The method starts with dOUGH: Knead flour, water, salt, sugar to a soft, pliable dough. Rest 30 mins.

Somun (Lepinja)

Spongy Balkan flatbread. The only authentic vessel for Cevapi. This version focuses on the Balkans style, with practical home-cooking guidance for texture, seasoning, and serving. Key ingredients include 1kg Flour, 700ml Water, 10g Dry Yeast, supported by the technique notes on the page. The method starts with dOUGH: Make a wet dough. Let rising 3 times (punch down in between).